


 ~ Chef Wilkinson ~
 Sunday, October 31, 2010
Friday, October 22, 2010

Thursday, October 21, 2010
-_-_-_- What's your Favorite? -_-_-_-
 COOKIE
Recently, I blogged about cupcakes and how expensive they have become. They are not alone ... have you priced gourmet cookies lately? They range from $1.75 up to $3.00 ... for a single cookie. WOW! They better be more than just delicious! ~ Chef Wilkinson ~


Wednesday, October 20, 2010
~*~*~*~* Ithaa Restaurant ~*~*~*~*
 If you ever just happen to be in the vicinity of Rangali Island, an island in the Maldives, just SW of India in the Arabian Sea make sure you check out this restaurant.
 It is the first underwater restaurant of its kind in the world. It sits 15 feet below the waves of the Indian Ocean, surrounded by a coral reef and encased in clear acrylic, offering diners 270-degrees of panoramic underwater views. It seats just 14 people. So the next time you are going to be in the area make sure you call for reservations. One can only hope the food is as spectacular as the view! ~ Chef Wilkinson ~

Tuesday, October 19, 2010
~ Pumpkin Seed Oil ~
 The culinary and medicinal value of pumpkin seed oil dates back hundreds of years. Pumpkin seed oil was a staple in the diet of ancient Aztecs, while Native Americans used the oil to treat kidney maladies and to eliminate intestinal parasites. In addition to providing the antioxidants vitamin A and E, pumpkin seed oil is a good source of magnesium, manganese, phosphorus and zinc. Fatty acids in pumpkin seed oil also provide lubricatio
 n to joints, thereby protecting against inflammatory conditions such as joint disease and arthritis. Pumpkin seed oil is also rich in phytosterols, which have been shown to reduce cholesterol levels. The nutty-flavored, dark green cold-pressed oil isn't widely available, but may be found in health food stores or where gourmet food products are sold. The oil is best used raw, however, as the nutritional value is lost through heating and cooking. Raw cold-pressed oil is a healthy addition to salad dressings or for dipping breads. ~ Chef Wilkinson ~
 Monday, October 18, 2010
- - - Cast Iron - - -
Amazingly, some of the first cast iron skillets, griddles and dutch ovens made over 100 years ago are still being put to good use. When Joseph Lodge began making cast iron in 1896, he began a legacy. I am sure most of you great cooks already know the Do's and Don'ts of Cast Iron ... but in case you've forgotten.
 ~ ~ ~ ~ ~ ~ ~ ~ ~ ~ ~ ~ ~ ~ ~ ~ ~ ~ ~
* Rinse with hot water (do not use soap) and dry thoroughly.
* Before cooking, apply vegetable oil to the cooking surface of your pan and pre-heat the pan slowly (always start on low heat increasing the temperature slowly).
* Once the utensil is properly pre-heated you are ready to cook.
TIP: Avoid cooking very cold food in the pan, as this can promote sticking.
* After cooking, clean utensil with a stiff nylon brush and hot water.
* Using soap is not recommended and harsh detergents should never be used.
* Avoid putting a hot utensil into cold water. Thermal shock can occur causing the metal to warp or crack.
 TIP: If you are having trouble removing stuck-on food boil some water in your pan for a few minutes to loosen the residue. Towel dry immediately and apply a light coating of oil to the utensil while it is still warm.
TIP: Do not let your cast iron air dry as this can promote rust.
* Store in a cool, dry place. If you have a cover, or lid, for your utensil place a folded paper towel in between lid and utensil allowing air to circulate. This prevents moisture from collecting inside the utensil, which can cause rust.
TIP: The oven is a great place to store your cast iron; just remember to remove it before turning on the oven.
* NEVER wash in the dishwasher.
* If for some reason your utensil develops a metallic smell or taste, or perhaps rust spots appear simply scour off the rust using a very fine grade of sandpaper or steel wool and re-season.
~ ~ ~ ~ ~ ~ ~ ~ ~ ~ ~ ~ ~ ~ ~
Re-Seasoning your Cast Iron
 ~ ~ ~ ~ ~ ~ ~ ~ ~ ~ ~ ~ ~ ~ ~
* Wash the cookware with hot, soapy water and a stiff brush. (It is okay to use soap this time because you are preparing to re-season the cookware).
* Rinse and dry completely.
* Apply a thin, even coating of MELTED solid vegetable shortening (or cooking oil of your choice) to the cookware (inside and out).
* Place aluminum foil on the bottom rack of the oven to catch any drippings.
* Set oven temperature to 350 – 400 degrees F.
* Place cookware upside down on the top rack of the oven.
* Bake the cookware for at least one hour. After the hour, turn the oven off and let the cookware cool in the oven.
* Store the cookware uncovered, in a dry place when cooled.
~ Chef Wilkinson ~
Friday, October 15, 2010
-^-^-^-^-^-^- JELL-O -^-^-^-^-^-^-
 As this marker points out Jell-O has been around for 110 years. The Jell-O plant in Mason City, Iowa produces America's entire supply of ready to eat Jell-O gelatin. As I am sure most of you know there are many ways in which Jello-O can be used in the kitchen. Below is a dessert, which is great for any occasion.
Ready in: 2-5 hours
Serves: 8

Ingredients:
1 package (3 oz. size) lime JELL-O
1 cup boiling water
1 can (9 oz. size) crushed pineapple, drain juice and reserve
1 (8 oz.) package of Philadelphia cream cheese, softened
1/2 cup whipping cream or evaporated milk, whipped
1/2 cup chopped nuts (optional)
Directions:
Dissolve gelatin in boiling water. Add pineapple juice. Fold in remaining ingredients. Chill until firm in a 1-quart or 1 1/2 quart Pyrex bowl, rectangular baking dish or a gelatin mold. ~ Chef Wilkinson ~

Thursday, October 14, 2010
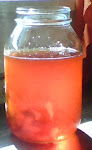
- Pickled Beets -
 Some people like 'em ...
some people don't.
The Ruby Queen Beet cans and pickles beautifully. This variety is early, round, smooth-skinned and are exceptionally tender. The ringless and deep red Ruby Queen Beet retains color through processing. Freshly dug beets have a buttery-sweet flavor. You get twice as much f or your effort, too: the young, green tops are deliciously nutritious. If you are thinking of planting some next year 1 ounce of beet seeds contains about 1,200 seeds and sows a 100-foot row. So you get a lot of yield for your money. ~ Chef Wilkinson ~
 or your effort, too: the young, green tops are deliciously nutritious. If you are thinking of planting some next year 1 ounce of beet seeds contains about 1,200 seeds and sows a 100-foot row. So you get a lot of yield for your money. ~ Chef Wilkinson ~
 Wednesday, October 13, 2010
~ Oktoberfest ~
 Oktoberfest is a 16-18 day festival held each year in Munich, Bavaria, Germany, running from late September to the first weekend in October. The Oktoberfest is an important part of Bavarian culture. Other cities across the world also hold Oktoberfest celebrations, modelled after the Munich event. Visitors eat huge amounts of traditional hearty fare such as Hend
 l (chicken), Schweinsbraten (roast pork), Schweinshaxe (ham hock), Steckerlfisch (grilled fish on a stick), Würstl (sausages) along with Brezn (Pretzel), Knödel (potato or bread dumplings), Kasspatzn (cheese noodles), Reiberdatschi (potato pancakes), Sauerkraut or Blaukraut (red cabbage) along with such
 Bavarian delicacies as Obatzda (a spiced cheese-butter spread) and Weisswurst (a white sausage).
 The original "Oktoberfest" occurred in Munich, on October 12, 1810. It was for the public commemoration of the marriage that took place five days before between Crown Prince Ludwig and Princess Therese of Saxe-Hildburghausen. The event was so successful that it was decided to renew it in 1811. So if you find an Oktoberfest event in your area ... make sure and give it a try! ~ Chef Wilkinson ~

Tuesday, October 12, 2010
*~*~ Caramel Cake *~*~
 This is NOT for amateur chefs ... so do NOT attempt if you are not patient!
- - - - - - - - - - - - - - - - - - - - - - -
Ingredients for cake:
3 1/2 cups all-purpose flour, sifted before measuring
2 teaspoons baking powder
1 cup (2 sticks) butter, softened
2 cups granulated sugar
6 eggs
1 cup milk
1 teaspoon vanilla extract
3 1/2 cups all-purpose flour, sifted before measuring
2 teaspoons baking powder
1 cup (2 sticks) butter, softened
2 cups granulated sugar
6 eggs
1 cup milk
1 teaspoon vanilla extract
 Preparation: Butter 2 9-inch layer cake pans; line the bottoms waxed paper. Butter the paper.
Sift the sifted flour and baking powder into a bowl. In a large mixing bowl, cream the butter until light, then gradually add the sugar, beating until creamy. Add the eggs, one at a time, and beat well after each addition. Stir in the flour mixture, a little at a time, alternately with the milk, beginning and ending with flour mixture. Stir well after each addition, but do not beat. Stir in the vanilla extract. Turn the batter into prepared cake pans. Bake in a preheated 325° oven until the cakes spring back when lightly touched near the center with a finger, about 35 minutes. Cool layers 10 minutes in the pans, then turn out onto cake racks to cool completely.
Now comes the tricky part ... the Frosting:
Prep time: 30 minutes
Prep time: 30 minutes

Makes: 3.5 cups
Ingredients:
Ingredients:
2 1/2 cups sugar
divided 1 egg
slightly beaten 1 stick butter, cut up
3/4 cup sweet milk
1 teaspoon vanilla
Directions:
Put 1/2 cup sugar in iron skillet and set aside. Beat egg and remaining 2 cups sugar until moist and creamy. Add milk and butter and cook over low heat until butter melts. Turn heat on skillet to low and heat until sugar is light brown and runny. While sugar is browning, increase the heat under the other ingredients, stirring constantly. When liquid mixture comes to a boil and the sugar is brown and runny, add the hot sugar to the boiling liquid mixture. Cook until it reaches the soft ball stage, about 10 minutes. Remove from heat. Cool slightly. Add vanilla. Beat until the consistency is right to spread. If it's too thick, add a little more milk.
Put 1/2 cup sugar in iron skillet and set aside. Beat egg and remaining 2 cups sugar until moist and creamy. Add milk and butter and cook over low heat until butter melts. Turn heat on skillet to low and heat until sugar is light brown and runny. While sugar is browning, increase the heat under the other ingredients, stirring constantly. When liquid mixture comes to a boil and the sugar is brown and runny, add the hot sugar to the boiling liquid mixture. Cook until it reaches the soft ball stage, about 10 minutes. Remove from heat. Cool slightly. Add vanilla. Beat until the consistency is right to spread. If it's too thick, add a little more milk.
Your patience will be rewarded! ~ Chef Wilkinson ~
Monday, October 11, 2010
~ ~ ~ Caramel Apples ~ ~ ~
 Prep Time: 20 minutes
Ingredients:
5 ripe, red apples
1 pound soft, store-bought caramels
2 tablespoons water
1/2 cup chopped peanuts
5 wooden skewers / popsicle sticks
Preparation: 
1. Begin by washing the apples and removing their stems. Stick the wooden skewers securely into the stem end of the apples.
2. Boil some water in the bottom of the double boiler. Unwrap the caramels, and place them in the top of the double boiler with the two tablespoons of water.
3. Place the pan with the candies over the boiling water. Let them heat up, and stir them gently until they are completely heated and smooth.
4. Remove the caramels from the heat. Dip the apples one at a time into the melted caramel and coat them.
5. Dip the tops into the chopped peanuts, and place each apple in a cupcake paper. Chill the apples in the fridge until the caramel is set. Enjoy! ~ Chef Wilkinson ~
Friday, October 8, 2010
~ ~ ~ Candy Apples ~ ~ ~
 A childhood favorite ... Candy Apples ... they bring back memories of fall weather and the fair.
Prep Time: 20 minutes
Ingredients:
8 apples
8 wooden skewers / popsicle sticks
2 cups granulated sugar
1 cup light corn syrup
1/2 cup hot water
1/2 cup red cinnamon candies, like Red Hots
Preparation:
1. Prepare a baking sheet by lining it with aluminum foil and spraying the foil with nonstick cooking spray.
2. Wash and dry the apples carefully. Remove the stems, and stick the skewers firmly in the stem ends.
3. Combine the water, corn syrup and sugar in a medium saucepan over medium-high heat. Stir until the sugar dissolves, then continue to cook, without stirring, until mixture reaches 250 degrees. Wash down the sides of the pan with a wet pastry brush occasionally to prevent crystallization.
4. Once the candy reaches 250, add the cinnamon candies and stir briefly to incorporate. Continue to cook, washing down the sides, until it reaches 285 degrees.
5. Remove from the heat and stir the candy so that it is smooth and even. Hold an apple by the skewer and dip it in the candy, tilting the pan at an angle and rotating the apple to cover it completely with a smooth, even layer. Bring it out of the candy and twirl it to remove excess, then set it on the prepared baking sheet. Repeat with remaining apples.
6. Allow apples to cool at room temperature. Candy apples are best enjoyed within 24 hours.
Monday ... Caramel Apples of course. ~ Chef Wilkinson ~
Thursday, October 7, 2010
~ * ~ Pumpkins ~ * ~
 Another food of the season. Of course we all know pumpkins make great pies and bread but what about these great pumpkin dishes.
Pumpkin Pancakes (picture compliments of Nicole)

Pumpkin Spice cake (picture compliments of Nicole)

Pumpkin Spice cake (picture compliments of Nicole)

Pumpkin pie ice cream
What's your favorite ~ ~ ~
pumpkin recipe?

~ Chef Wilkinson ~
Wednesday, October 6, 2010
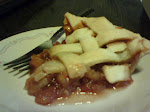
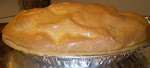
~ Roasted Apple Butter ~
 I came across this recipe which sounds delicious and it uses McIntosh Apples.
~~~~~~~~~~~~~~~~~~~~
Ingredients
2 3/4 pounds McIntosh apples (about 8)--peeled, quartered and cored
2 cups unsweetened apple juice
~~~~~~~~~~~~~~~~~~~~~~
2 3/4 pounds McIntosh apples (about 8)--peeled, quartered and cored
2 cups unsweetened apple juice
~~~~~~~~~~~~~~~~~~~~~~
Directions
Preheat the oven to 450°. Arrange the apples in a large roasting pan. Pour the apple juice over the apples and bake for 30 minutes, or until tender and browned. Lower the oven to 350°. Using a fork or potato masher, thoroughly mash the apples in the roasting pan. Bake the apple puree, stirring occasionally, for 1 1/2 to 1 3/4 hours, or until very thick and deeply browned. Scrape into a bowl and let cool. Makes about 3 cups. Serve at room temperature or chilled.
Make ahead the apple butter can be refrigerated for up to 3 days. ~ Chef Wilkinson ~

Tuesday, October 5, 2010
~ McIntosh Apples ~

 Fall also means it is ... McIntosh Apple Time! It is one of the earliest apples of the season. They will start to appear the middle of September if the temperature drops below 60 degrees Fahrenheit ... but wait until the end of September or early October to buy and eat. That way you'll get an apple that has matured on the tree and has a wonderful flavor - any earlier and it will taste green. They're not very good bakers because they turn to mush in the oven. When choosing a McIntosh don't worry if its color is more green than red, so long as it has a little red blush on it. As with any apple, make sure the stem is still attached - a reliable indication that it's not overripe. McIntosh Apples keep very well - three or four weeks - in a cool place. If your only option is to keep them in a heated house then refrigerate them. The apple should feel heavy in the hand for its size and have a good shine on it. A dull look usually means the fruit has been in storage too long. So pick a bushel or two, eat and enjoy delicious McIntosh Apples while they are in season! ~ Chef Wilkinson ~
Monday, October 4, 2010
~ Sweet Potatoes ... Part 2 ~
 Once sweet potatoes have been harvested they need a curing period of at least a week in order to heal any splits and firm up their skins. This process will allo
 w them to be stored for quite a long time making them a perfect fall and winter vegetable. Sweet potatoes love cool dry storage areas that are well ventilated but that does not include the refrigerator. They will usually keep about a month if stored properly. Cooked sweet potatoes freeze very well and will keep up to six months. Their natural sweetness can be enhanced by adding cinnamon, nutmeg, ginger, roasted pecans, walnuts, butter, honey or don't forget marshmallows. ~ Chef Wilkinson ~
Friday, October 1, 2010
Sweet Potatoes -vs- Yams
 Which is it? You are not alone if you can't tell them apart. The confusion began in the 1930's when Southern growers started using the term yam to differentiate their crop from the ones in the North. They selected the incorrect term though because sweet potatoes and yams are not related. Sweet potatoes come from the morning glory family. Yams have a plant family all of their own. Sweet potatoes have a moist flesh that tastes sweet and contains high amounts of beta carotene or Vitamin A. Yams have a dry flesh that tastes starchy, with practically no beta carotene content. Sweet potatoes have smooth, thin skins. Yams are rough and scaly. Sweet potatoes have a growing season that ranges from 90-150 days. Yams grow year-around. True yams are not actually grown in the US they are imported from tropical areas of the world. More on Sweet Potatoes -vs- Yams on Monday. ~ Chef Wilkinson ~
Subscribe to:
Comments (Atom)


